Creating your own silicone night light can be a fun and rewarding project. It allows you to customize the design and functionality to suit your needs. DIY projects are also a great way to spend time with your kids and teach them about creativity and craftsmanship. This guide will walk you through several DIY silicone night light projects, providing simple instructions and tips to help you succeed.
Why Choose Silicone?
Silicone is an excellent material for DIY night lights. Here are some reasons why:
- Soft and Safe: Silicone is soft and flexible, making it safe for children to handle. It’s also non-toxic and free from harmful chemicals.
- Durable: Silicone is durable and can withstand drops and rough handling. This ensures your DIY night light will last longer.
- Easy to Work With: Silicone is easy to mold and shape, making it perfect for DIY projects. You can create various designs and customize them to your liking.
Basic Materials Needed
Before starting your DIY silicone night light project, gather the following materials:
- Silicone Mold: You can buy silicone molds in various shapes and sizes. Choose a mold that fits your desired design.
- Silicone: Purchase silicone suitable for crafting. Ensure it is safe and non-toxic.
- Rechargeable Night Light Base: You can buy rechargeable night light bases online or from craft stores. These bases come with LED lights and a battery, providing the light source for your project.
- Mixing Tools: You will need mixing bowls, spatulas, and measuring cups to mix the silicone.
- Optional Additions: You can add glitter, dye, or small decorations to the silicone to make your night light more interesting.
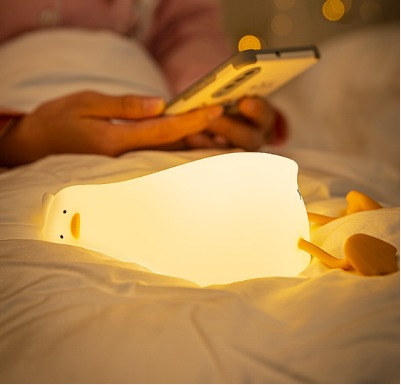
Project 1: Simple Silicone Animal Night Light
A simple silicone animal night light is a great project for beginners. Here’s how to create one:
- Choose Your Mold: Select an animal-shaped silicone mold. Common options include bears, bunnies, and cats.
- Prepare the Silicone: Follow the instructions on the silicone package to prepare the mixture. Pour the silicone into the mold, filling it to the top.
- Add Decorations: If you want to add glitter or dye, mix it into the silicone before pouring. You can also place small decorations inside the mold.
- Insert the Light Base: Place the rechargeable night light base at the bottom of the mold. Ensure it is centered and not touching the sides of the mold.
- Let It Cure: Allow the silicone to cure according to the instructions. This usually takes several hours to a day.
- Remove from Mold: Once cured, gently remove the silicone night light from the mold. Your animal-shaped night light is ready to use!
Project 2: Color-Changing Silicone Star Night Light
A color-changing silicone star night light adds a magical touch to any room. Here’s how to make one:
- Select a Star Mold: Choose a star-shaped silicone mold. Ensure it is large enough to hold the rechargeable night light base.
- Prepare the Silicone: Mix the silicone according to the package instructions. Pour the silicone into the mold.
- Add Color-Changing Dye: To create a color-changing effect, add a small amount of color-changing dye to the silicone mixture. Stir well to ensure an even distribution.
- Insert the Light Base: Place the rechargeable night light base at the bottom of the mold. Ensure it is properly positioned.
- Cure the Silicone: Allow the silicone to cure completely. This can take several hours to a full day.
- Unmold the Night Light: Once cured, carefully remove the night light from the mold. Your color-changing star night light is now ready!
Project 3: Personalized Silicone Name Night Light
A personalized silicone name night light is a unique and thoughtful gift. Here’s how to create one:
- Create a Custom Mold: You can buy custom silicone molds with letters to spell out a name. Alternatively, you can create your own mold using a silicone mold kit.
- Mix the Silicone: Prepare the silicone mixture as directed on the package. Pour the silicone into the custom mold, filling each letter.
- Add Personal Touches: Add glitter, dye, or small decorations to the silicone for a personalized touch.
- Place the Light Base: Insert the rechargeable night light base at the bottom of the mold. Ensure it fits well with the letter shapes.
- Allow to Cure: Let the silicone cure completely. Follow the curing time recommended on the package.
- Remove from Mold: Once cured, carefully remove the letters from the mold. Arrange them to spell out the name and connect them to the light base. Your personalized name night light is complete!
Tips for Successful DIY Projects
Here are some tips to help ensure your DIY silicone night light projects are successful:
- Read Instructions Carefully: Always follow the instructions on the silicone and light base packages. This ensures the materials are used correctly and safely.
- Work in a Well-Ventilated Area: Some silicone products can emit fumes. Work in a well-ventilated area or outdoors to ensure safety.
- Use Protective Gear: Wear gloves and a mask when working with silicone. This protects your skin and prevents inhalation of fumes.
- Be Patient: Allow the silicone to cure fully before removing it from the mold. Rushing the process can result in a damaged or incomplete night light.
- Get Creative: Don’t be afraid to experiment with different shapes, colors, and decorations. Personalize your night light to make it unique and special.
Conclusion
Creating DIY silicone night lights is a fun and rewarding activity. With a few simple materials and some creativity, you can make beautiful and functional night lights for your home. Whether it’s a simple animal shape, a color-changing star, or a personalized name, these projects offer endless possibilities. Follow the steps outlined in this guide, and enjoy the process of making your very own silicone night light.
Keep an eye for more news & updates on TribuneBreaking.Com!